Elastic Container Service (ECS) is a container management service that is scalable, secure, reliable and fast. ECS can launch containers in EC2 or serverless in what is called Fargate. For either launch types, ECS will be orchestrating the containers and managing the cluster.
Amazon ECS is a regional service that simplifies running application containers in a highly available manner across multiple Availability Zones within a Region. You can create Amazon ECS clusters within a new or existing VPC. After a cluster is up and running, you can define task definitions and services that specify which Docker container images to run across your clusters. Container images are stored in and pulled from container registries, which may exist within or outside of your AWS infrastructure.

The ECS Stack
The following stack shows how we deploy an app container into ECS.

Containers
To deploy applications on Amazon ECS, your application components must be architected to run in containers. This can be done using Dockerfile, which defines a container image. These images can be hosted on a registry like ECR, more details below. ECS will be running the containers from some registry.
Task
To prepare your application to run on Amazon ECS, you create a task definition. The task definition is a text file, in JSON format, that describes one or more containers, up to a maximum of ten, that form your application. It can be thought of as a blueprint for your application.
{
    "family": "webserver",
    "containerDefinitions": [
        {
            "name": "web",
            "image": "nginx",
            "memory": "100",
            "cpu": "99"
        },
    ],
    "requiresCompatibilities": [
        "FARGATE"
    ],
    "networkMode": "awsvpc",
    "memory": "512",
    "cpu": "256",
}
A single task definition can be used by multiple tasks.
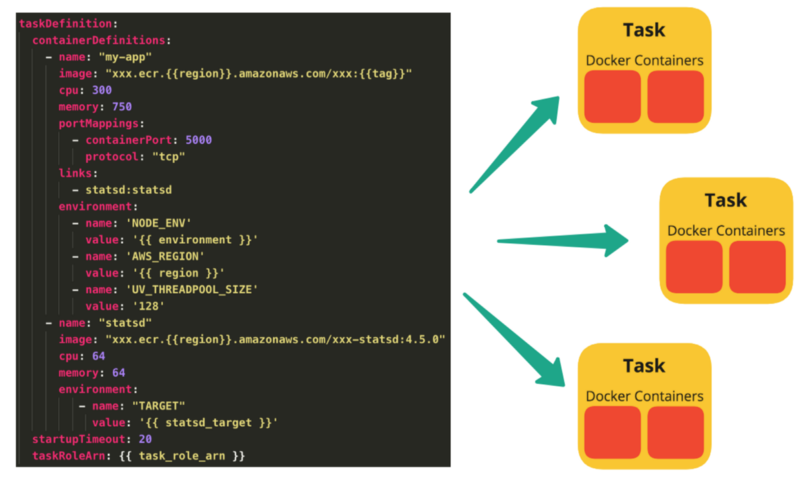
A task is the instantiation of a task definition within a cluster. After you have created a task definition for your application within Amazon ECS, you can specify the number of tasks that will run on your cluster.
Each task that uses the Fargate launch type has its own isolation boundary and does not share the underlying kernel, CPU resources, memory resources, or elastic network interface with another task.
The Amazon ECS task scheduler is responsible for placing tasks within your cluster. There are several different scheduling options available. For example, you can define a service that runs and maintains a specified number of tasks simultaneously. For more information about the different scheduling options available, see Scheduling Amazon ECS Tasks.

Service
A service defines the minimum and maximum number of tasks to run per each task definition at any one time. This includes things like auto-scaling and load balancing. The service is going to define how much performance the application will be running at – for example if the CPU utilization hits a certain threshold the Service can spin up more or less tasks.
Cluster
When you run tasks using Amazon ECS, you place them on a cluster, which is a logical grouping of resources. When using the Fargate launch type with tasks within your cluster, Amazon ECS manages your cluster resources. When using the EC2 launch type, then your clusters are a group of container instances you manage. An Amazon ECS container instance is an Amazon EC2 instance that is running the Amazon ECS container agent. Amazon ECS downloads your container images from a registry that you specify, and runs those images within your cluster.
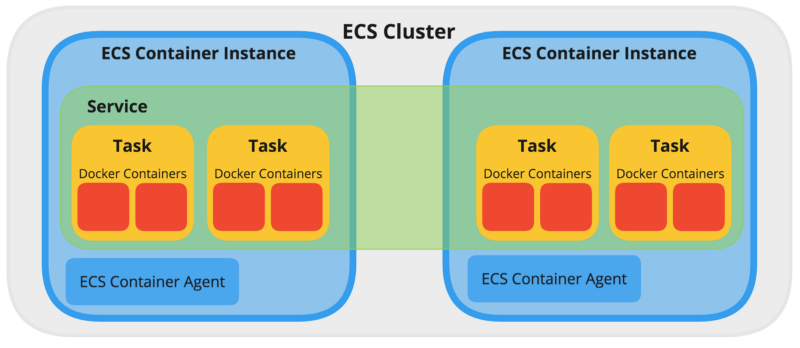
An example ECS cluster, with one Service running four Tasks across two ECS Container Instances/Nodes.
Container Agent
The cluster is managed by the Container Agent. The container agent runs on each infrastructure resource within an Amazon ECS cluster. It sends information about the resource’s current running tasks and resource utilization to Amazon ECS, and starts and stops tasks whenever it receives a request from Amazon ECS. For more information, see Amazon ECS Container Agent.

On top of the container agent, we can also configure logging through CloudWatch by installing a CloudWatch log agent. This can be installed in the EC2 by running the CloudWatch log agent installer through the AWS CLI.
Once a cluster is created and tasks running, we can do the following test to see the agents running on the host EC2. SSH into the host EC2 and run the following commands to see the Agent information. Note that the agent has reserved port 51678.
[ec2-user@ip-10-10-10-10 ~]$ docker info
Containers: 1
 Running: 1
 Paused: 0
 Stopped: 0
Images: 2
Server Version: 18.06.1-ce
Storage Driver: devicemapper
 Pool Name: docker-docker--pool
 Pool Blocksize: 524.3kB
 Base Device Size: 10.74GB
 Backing Filesystem: ext4
 Udev Sync Supported: true
 Data Space Used: 332.4MB
 Data Space Total: 23.33GB
 Data Space Available: 23GB
 Metadata Space Used: 2.736MB
 Metadata Space Total: 25.17MB
 Metadata Space Available: 22.43MB
 Thin Pool Minimum Free Space: 2.333GB
 Deferred Removal Enabled: true
 Deferred Deletion Enabled: true
 Deferred Deleted Device Count: 0
 Library Version: 1.02.135-RHEL7 (2016-11-16)
Logging Driver: json-file
Cgroup Driver: cgroupfs
Plugins:
 Volume: local
 Network: bridge host macvlan null overlay
 Log: awslogs fluentd gcplogs gelf journald json-file logentries splunk syslog
Swarm: inactive
Runtimes: runc
Default Runtime: runc
Init Binary: docker-init
containerd version: 468a545b9edcd5932818eb9de8e72413e616e86e
runc version: 69663f0bd4b60df09991c08812a60108003fa340
init version: fec3683
Security Options:
 seccomp
  Profile: default
Kernel Version: 4.14.146-93.123.amzn1.x86_64
Operating System: Amazon Linux AMI 2018.03
OSType: linux
Architecture: x86_64
CPUs: 1
Total Memory: 985.8MiB
Name: ip-10-220-61-68
ID: IABCDE
Docker Root Dir: /var/lib/docker
Debug Mode (client): false
Debug Mode (server): false
Registry: https://index.docker.io/v1/
Labels:
Experimental: false
Insecure Registries:
 127.0.0.0/8
Live Restore Enabled: false

{"AvailableCommands":["/v1/metadata","/v1/tasks","/license"]}

[ec2-user@ip-10-10-10-10 ~]$ curl -s localhost:51678/v1/metadata
{"Cluster":"microtrader-cluster","ContainerInstanceArn":"arn:aws:ecs:us-west-2:1234567890:container-instance/123-123-123-123-123","Version":"Amazon ECS Agent - v1.32.1 (4285f58f)"}

[ec2-user@ip-10-10-10-10 ~]$ curl -s localhost:51678/v1/tasks
{"Tasks":[]}
ECS on Fargate
AWS Fargate is a technology that you can use with Amazon ECS to run containers without having to manage servers or clusters of Amazon EC2 instances. With AWS Fargate, you no longer have to provision, configure, or scale clusters of virtual machines to run containers. This removes the need to choose server types, decide when to scale your clusters, or optimize cluster packing.
When you run your tasks and services with the Fargate launch type, you package your application in containers, specify the CPU and memory requirements, define networking and IAM policies, and launch the application. Each Fargate task has its own isolation boundary and does not share the underlying kernel, CPU resources, memory resources, or elastic network interface with another task.
Elastic Container Registry (ECR)
Amazon ECR is a managed AWS Docker registry service. Customers can use the familiar Docker CLI to push, pull, and manage images. Amazon ECR provides a secure, scalable, and reliable registry. Amazon ECR supports private Docker repositories with resource-based permissions using AWS IAM so that specific users or Amazon EC2 instances can access repositories and images. Developers can use the Docker CLI to author and manage images.
Example of use on PowerShell:
PS C:\Projects\ecswidgets> Invoke-Expression -Command (Get-ECRLoginCommand -Region us-west-2).Command
WARNING! Using --password via the CLI is insecure. Use --password-stdin.
Login Succeeded
PS C:\Projects\ecswidgets> docker push acctnumber.dkr.ecr.us-west-2.amazonaws.com/ecswidgets
The push refers to repository [acctnumber.dkr.ecr.us-west-2.amazonaws.com/ecswidgets]
feff5fadaa2f: Pushed
3df95eeb30f8: Pushed
f8ce6ccff9bb: Pushed
2b3eb0530681: Pushed
8130a4bb60f2: Pushed
0d7d138cc2e6: Pushed
b9bcafc2c66c: Pushed
b67d19e65ef6: Pushed
latest: digest: sha256:3ece65c94457e31434633b145383c1f66d46a3afc810df5aca5448052fe77507 size: 2000
Example of use on BASH: (note we run the get-login command and then run the resulting command thereafter to login)
johnlee@mb:~/ecswidgets/$ aws ecr get-login --no-include-email
docker login -u AWS -p somekeyxxx https://acctnumber.dkr.ecr.us-west-2.amazonaws.com
johnlee@mb:~/ecswidgets/$ docker login -u AWS -p somekeyxxx https://accountnumber.dkr.ecr.us-west-2.amazonaws.com
johnlee@mb:~/ecswidgets/$ docker push acctnumber.dkr.ecr.us-west-2.amazonaws.com/dockerproductionaws/microtrader-audit
The push refers to repository [acctnumber.dkr.ecr.us-west-2.amazonaws.com/ecswidgets]
feff5fadaa2f: Pushed
3df95eeb30f8: Pushed
f8ce6ccff9bb: Pushed
2b3eb0530681: Pushed
8130a4bb60f2: Pushed
0d7d138cc2e6: Pushed
b9bcafc2c66c: Pushed
b67d19e65ef6: Pushed
ECS Sample App
This sample application demonstrates the creation and deployment of a .net core based docker app using ECS and ECR. The deployment will utilize ECS’s scalability features to perform auto scaling and load balancing. The app is a webapi that takes a given number and tries to compute the prime numbers. This is to create some load on the host.
The full source code can be found here:
https://github.com/solidfish/automusprimes
The following steps are taken to deploy this app into ECS.
- Push dockerized app into ECS
- Create ECS cluster
- Create a task definition
- Create Application Load Balancer and Target Group
- Create ECS Service
The container’s dockerfile looks like so:
FROM mcr.microsoft.com/dotnet/core/aspnet:3.0-buster-slim AS base
WORKDIR /app
EXPOSE 80
EXPOSE 443

FROM mcr.microsoft.com/dotnet/core/sdk:3.0-buster AS build
WORKDIR /src
COPY automusprimes.csproj ./
RUN dotnet restore "./automusprimes.csproj"
COPY . .
WORKDIR "/src/."
RUN dotnet build "automusprimes.csproj" -c Release -o /app/build

FROM build AS publish
RUN dotnet publish "automusprimes.csproj" -c Release -o /app/publish

FROM base AS final
WORKDIR /app
COPY --from=publish /app/publish .
ENTRYPOINT ["dotnet", "automusprimes.dll"]
First we need to push the image into ECR. This is done by the following commands, which AWS gives us:
1. Retrieve the login command to use to authenticate your Docker client to your registry.
Use the AWS CLI:
$(aws ecr get-login --no-include-email --region us-west-2)

Note: If you receive an "Unknown options: --no-include-email" error when using the AWS CLI, ensure that you have the latest version installed.

2. Build your Docker image using the following command. For information on building a Docker file from scratch see the instructions here . You can skip this step if your image is already built:
docker build -t automusprimes .

3. After the build completes, tag your image so you can push the image to this repository:
docker tag automusprimes:latest xxxxxx.dkr.ecr.us-west-2.amazonaws.com/automusprimes:latest

4. Run the following command to push this image to your newly created AWS repository:
docker push xxxxxx.dkr.ecr.us-west-2.amazonaws.com/automusprimes:latest
With the image uploaded into ECR, we are now ready to create the ECS cluster.
I’ve got a VPC configured with two subnets connected to an Internet Gateway and security group setup to allow HTTP inbound and outbound connections. My cluster has 2 nodes, t2.smalls, which will be configured later with load balancing and scaling.

With the cluster created, I have the following task definition for running my containers. The task will run on EC2 so I only need to define the roles, network and container it will use. For task size I only need to set the memory settings.

More details on configuring tasks can be found here:
https://docs.aws.amazon.com/AmazonECS/latest/developerguide/task_definition_parameters.html
With the task setup, we’ll setup the load balancer before kicking off the service. We need to make sure the load balancer is running on a public subnet accessible from the internet. On the EC2 console, we create the following application load balancer. Note that our app has an endpoint called “/health” which returns an HTTP 200 OK. This is used by the load balancer for pulse checks.

Note also that as part of creating a load balancer, we must also create a target group. This is a grouping that our service will later push it’s tasks into. This is what maps the load balancer to the containers. More information about target groups can be found here:
Last step is to setup the service. From the ECS dashboard, I can click back into the task definition that was created above. There is a button on the top “Actions” with an option to “Create Service”. This service is what will be bringing our task definition into the cluster.
The service definition is what will bring the task definition into our cluster. The service creation form has 6 main sections. You can follow the step-by-step instructions here on details for each of the fields:
https://docs.aws.amazon.com/AmazonECS/latest/developerguide/create-service.html
For this sample application I’ve configured the service to enable auto load balancing, using the load balancer created above, and auto scaling. Note that for auto load balancing, the containers must have a port number exposed. This is done in the Task Definition when adding the container. AWS will prompt you if this is not configured. You can see below my container has port 80 exposed.

More information on setting up the load balancer for the service can be found here:
https://docs.aws.amazon.com/AmazonECS/latest/developerguide/service-load-balancing.html
With the auto load balancer, I can see the container ID changing when submitting multiple requests to the API. Example:
{
  "containerId": "ip-10-0-2-17",
  "givenNumber": 100000,
  "numberOfPrimes": 9592,
  "elapsedTime": "00:00:18.56"
}
...
{
  "containerId": "ip-10-0-2-40",
  "givenNumber": 100000,
  "numberOfPrimes": 9592,
  "elapsedTime": "00:00:18.26"
}
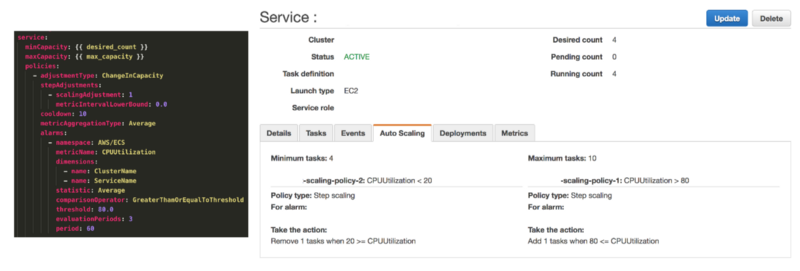
I’ve set the scaling to use a target tracking method where it monitors CPU utilization and when it goes over a set percentage, it will spin up a new container. You also define minimum containers needed, the desired count, and the maximum count.

Later when I’ve applied load to the application by submitting requests for larger prime numbers, and multiple requests, I see the auto scaler spin up more instances. This can be seen in the service’s event log as well.

Deploying updates to docker image
When the docker image is updated, we can simply update our service to pickup those changes. Note that if our task definition above was not pointing to ‘latest’ tag but a specific version, then we would need to create a revised task definition with the updated version number. Then the service will need to be updated to pickup the new tasks.
If a service is using the rolling update (ECS) deployment type, the maximum percent parameter represents an upper limit on the number of tasks in a service that are allowed in the RUNNING or PENDING state during a deployment, as a percentage of the desired number of tasks (rounded down to the nearest integer). The parameter also applies while any container instances are in the DRAINING state if the service contains tasks using the EC2 launch type. This parameter enables you to define the deployment batch size. For example, if your service has a desired number of four tasks and a maximum percent value of 200%, the scheduler may start four new tasks before stopping the four older tasks. That’s provided that the cluster resources required to do this are available. The default value for the maximum percent is 200%.
More information about updating services with new images can be found here:
https://docs.aws.amazon.com/AmazonECS/latest/developerguide/update-service.html
Adding more Container Instances
This sample app only uses 2 container instances (EC2s) but we can easily add on more. Information about getting new EC2 instances launched into an existing cluster can be found here:
https://docs.aws.amazon.com/AmazonECS/latest/developerguide/launch_container_instance.html
Service Discovery and errors when recreating services
Note that when creating services, we have an option to use what is called ECS Service Discovery. This allows our services to be registered with Route 53 and thereby having DNS friendly names. More information about this can be found here:
https://aws.amazon.com/blogs/aws/amazon-ecs-service-discovery/
When this feature is enabled and we delete a service, we need to ensure the Service Discovery record is also deleted, otherwise it will be kept in Route 53. This will prevent future services to occupy same namespaces in the future. If a service is deleted without the Service Discovery, the records can still be cleaned up using the AWS CLI. See post below for more details.
https://stackoverflow.com/questions/53370256/aws-creation-failed-service-already-exists-service-awsservicediscovery-stat
Easy Button for example tutorial
Note, AWS Tutorial provides an easy deploy option using Fargate where it will create VPCs, subnets and security groups for you from scratch. This deployment will allow internet access and the containers will be running on t2.micro instances
https://us-west-2.console.aws.amazon.com/ecs/home?region=us-west-2#/firstRun
References
Developer Guide
https://docs.aws.amazon.com/AmazonECS/latest/developerguide
Fargate
https://docs.aws.amazon.com/AmazonECS/latest/developerguide/AWS_Fargate.html
Free Code Camp
https://www.freecodecamp.org/news/amazon-ecs-terms-and-architecture-807d8c4960fd/
Managing Docker Container on AWS
https://app.pluralsight.com/course-player?course=aws-managing-docker-containers
Docker in Production using AWS
https://app.pluralsight.com/library/courses/docker-production-using-amazon-web-services
AWS ECS DEVOXX
https://medium.com/arhs-spikeseed/how-to-deploy-and-scale-your-app-in-minutes-with-containers-and-aws-ecs-e49dae446928
Deploy Docker Containers on ECS
https://aws.amazon.com/getting-started/tutorials/deploy-docker-containers/